
Data Binding
Motivation
Data often defines the look of an application. Interpreting that data into the user interface involves class logic (.component.ts) and a template view (.component.html). Angular connects them through data binding. Think of data binding as a tool for component interaction.
Component and Template
The component stores most of its logic and data inside of its class decorated with @Component. This decorator defines the class as a component with template HTML. The template of the component represents the class within the application. The focus here needs to be between the component’s class and the template HTML.
This is where data binding occurs. Element properties and events get assigned values. These values, defined by the component class, serve either one of two roles. One is to produce data that the template then receives. The other handles events emitted by the template element.
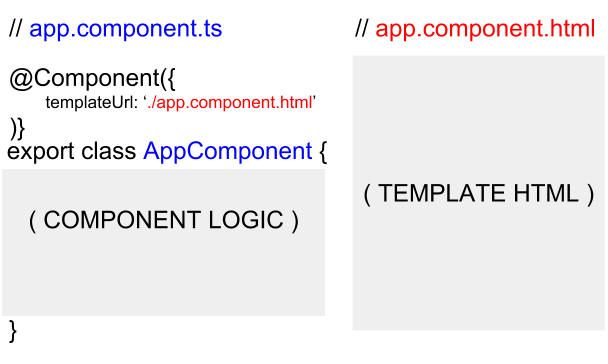
Try to use this picture as a mental model for the next section.
Directions of Binding
There are two ways in which data is bound: unidirectional and bidirectional. Angular technically only uses unidirectional data flow. Bidirectional flow is ultimately unidirectional. It happens in two applications of unidirectional flow, once for each direction. More on that later.
Unidirectional flow defines one-way interaction. Either the component sends data to the template or the template emits an event to the component logic. Data changes within scope of the template are not percolate to the component class. Event emitting is a one-way transaction beginning from the template’s elements.
Bidirectional constitutes both directions. This means changes to the data in the class logic or template HTML persist across each other. The scope of the changes are the component’s view. The view comprises the component’s class and template together.
Element Properties
To recognize data-bound element properties, Angular uses a special bracket syntax.
// my.component.ts
@Component({
  templateUrl: './my.component.html'
})

export class MyComponent {
  value:type = /* some value of type */;
}
<!-- my.component.html -->
<any-element [property]=“value”>innerHTML</any-element>Bear with me on this one.
[property] mirrors the property in the Domain Object Model (DOM) element’s object node. Do not confuse object properties with a DOM element’s attributes. Properties and attributes often share the same name and do the same thing. There is one clear distinction however.
Remember that attr (attributes) is a single property of the underlying DOM object. It gets declared at the DOM’s instantiation with attribute values matching the element’s definition. It maintains the same value after that. Properties each have their own key-value field in a DOM object node. These properties are mutable post-instantiation.
Know the difference between attributes and properties. It will lead to a better understanding of how Angular binds data to properties (property binding). Angular will hardly ever bind data to an element’s attributes. Exceptions to this are very rare. One last time: Angular binds component data to properties, not attributes!
Referring back to the example, the [ … ] in the element’s property assignment have special meaning. The brackets show that property is bound to “value” on the right of the assignment.
value also has special meaning within context of the brackets. value by itself is a string literal. Angular reads it and matches its value against component class members. Angular will substitute the value of the matching member attribute. This of course refers to the same component class that hosts the template HTML.
The unidirectional flow of data from component to template is complete. The member matched against right assignment of the bracketed property provides the value. Note that changes to the member’s value in the component class percolate down to the template. That is Angular’s change detection at work. Changes within the template’s scope have no effect on the component class member.
Key take-away: the component class provides the data while the template displays it.
I failed to mention that data values can also show up in a component’s innerHTML. This last example implements double curly braces. Angular recognizes these braces and interpolates the matching component class data into the innerHTML of the div.
<div>The value of the component class member ‘value’ is {{value}}.</div>Event Handling
If the component supplies data, then the template supplies events.
// my.component.ts
@Component({
  templateUrl: './my.component.html'
})

export class MyComponent {
  handler(event):void {
      // function does stuff
  }
}
// my.component.html
<any-element (event)=“handler($event)”>innerHTML</any-element>This works similarly to property binding.
The (event) pertains to any valid event type. For example, one of the most common event types is click. It emits when you click your mouse. Regardless of the type, event is bound to “handler” in the example. Event handlers are usually member functions of the component class.
The ( … ) are special to Angular. Parenthesis tell Angular an event is bounded to the right assignment of handler. The event itself originates from the host element.
When the event does emit, it passes the Event object in the form of $event. The handler maps to the identically named handler function of the component class. The unidirectional exchange from the event-bound element to the component class is complete.
Emitting events from the handler, while possible, do not impact the template element. The binding is unidirectional after all.
Bidirectional Binding
Input forms provide a great example of why bidirectional binding is necessary. Bidirectional data bindings are more costly than event or property bindings.
Bidirectional data binding has its own module. Before taking a look at that, consider the following example.
// my.component.ts
@Component({
  templateUrl: './my.component.html'
})
export class MyComponent {
  inputValue:string = "";

  handler(event) {
      this.inputValue = event.target.value;
  }
}
<!-- my.component.html -->
<input (input)=“handler($event)” [value]=“inputValue”>Time to break this down.
This example combines the previous two. That explains why it is more costly. Following the logic, assume the user types something into the input element. The element emits an input event to the handler of the template’s component class. The handler assigns the class member inputValue to the value of the emitted event. This concludes the event handling/binding.
Now onto the property binding. The inputValue was assigned a new value. Since inputValue is bound to the input element’s value, its change in data percolates down into the input element’s value property. The input element’s value matches up with inputValue. This concludes the property binding.
There you have it. Bidirectional data binding happens with both applications of unidirectional binding applied consecutively. The syntax is a bit messy though.
Thankfully, Angular provides NgModel to simplify the syntax. The below example is synonymous to the above.
// my.component.ts
@Component({
  templateUrl: ‘./my.component.html’
})

export class MyComponent {
  inputValue:string = "";
}
<!-- my.component.html -->
<input [(ngModel)]=“inputValue”>ngModel is a nice convenience. You have to import the FormsModule in your application’s root before using it. With that squared away, bidirectional data binding becomes much easier to work with.
To reinforce all you have learned, check out this picture from the official Angular Documentation1.
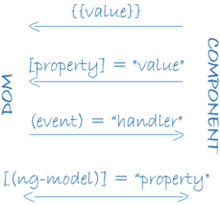
You can visually summarize everything up until this point with this picture. Angular’s Documentation has plenty of other pictures worth seeing. This one should suffice given the scope of this article.
Component to Component
To bind data and events across different components, you must use the @Input and @Output decorators. Angular components are privately scoped. None of a component’s members are accessible from anywhere outside of its native view.
The @Input decorator indicates a member’s value is sourced from the parent function. This requires visualization to better understand.
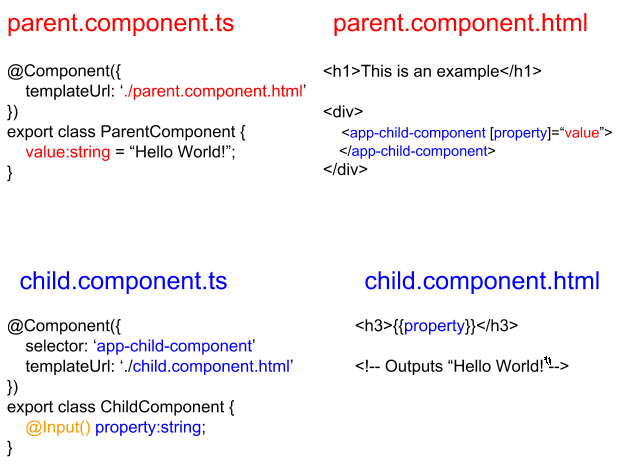
Notice the passing of the parent’s value member into the child’s property member. This would not be possible if property had no @Input decorator. The Angular compiler depends upon it.
Another example for @Output shows how an event travels from child to parent. Keep in mind that @Output almost always pertains to custom event bindings.
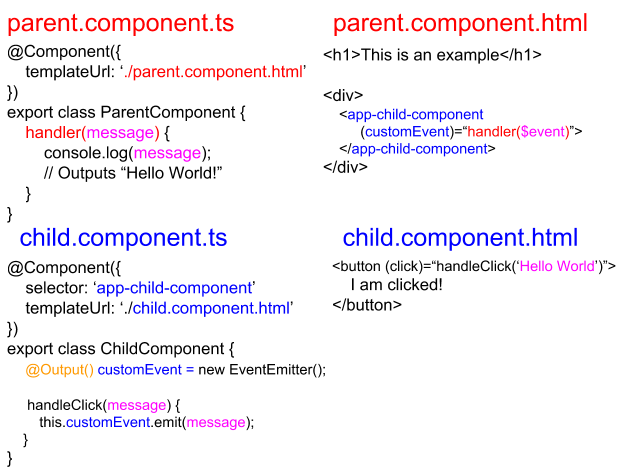
Make sure you import EventEmitter, @Input, and @Output from @angular/common if you intend to replicate either of these examples.
Conclusion
This is a good place to stop. Data binding spans a wide array of use cases. This topic is worth exploring further on Angular’s website. These are not the only ways that you can manipulate data in Angular. See the links under Resources for more information.